Grease Rebuilds: Tackling Persistent Oven Stains in SW15
Posted on 18/06/2026
If you have scrubbed an oven door, wiped the cavity, and still spotted that sticky amber film creeping back a few days later, you are not imagining it. Grease rebuilds happen when residue is left behind in seams, around fan covers, beneath seals, or on surfaces that were cleaned quickly but not fully degreased. In SW15, where busy homes, shared kitchens, and end-of-tenancy turnarounds all happen in close sequence, persistent oven stains can become a proper nuisance. This guide to Grease Rebuilds: Tackling Persistent Oven Stains in SW15 explains why grease keeps returning, what actually works, and how to decide whether a deep clean is enough or a professional reset makes more sense.
We will keep it practical. No fluff, no miracle claims. Just clear steps, a few hard-earned tips, and the sort of detail that saves you from doing the same job twice. Truth be told, ovens are excellent at hiding grime until the heat brings it all back to the surface. That is the annoying bit.

Why Grease Rebuilds: Tackling Persistent Oven Stains in SW15 Matters
Persistent oven stains are not just a cosmetic issue. They affect smell, cooking performance, and how quickly new dirt starts to cling. A thin layer of baked-on grease can smoke when the oven heats up, making roast dinners smell faintly burnt before they have even begun. Nobody wants that. And if you are preparing a property for new tenants or trying to keep a family kitchen hygienic, visible residue creates a much worse impression than people like to admit.
Grease rebuilds matter because they usually mean one thing: the original clean was incomplete. A quick surface wipe can lift the easy bits, but grease loves edges, hinges, grills, seals, control knobs, and the gap beneath the bottom panel. Once heat cycles begin again, hidden residue softens, spreads, and reforms into those stubborn brown patches that seem to come back from nowhere. Annoying, yes. Common, also yes.
In a local area like SW15, practical timing matters too. Many households are juggling work, school runs, guests, or move-out deadlines. If the oven has to be usable again by tomorrow morning, you need a method that is both effective and realistic. That is where proper grease rebuild treatment comes in: targeted degreasing, correct dwell time, careful detail work, and a final check for the bits most people miss.
If you want a broader look at how oven care fits into a bigger cleaning plan, the guidance in deep cleaning services in Putney and the overview on available cleaning services can help you see where oven work sits alongside other deep-clean tasks.
How Grease Rebuilds: Tackling Persistent Oven Stains in SW15 Works
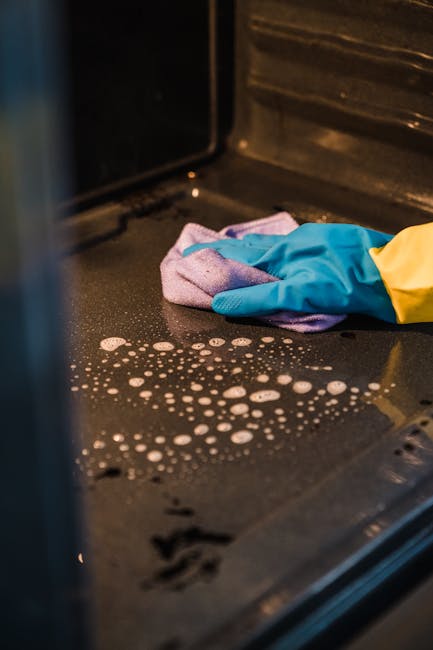
At its simplest, the process is about breaking down grease at the point where it bonds to the surface, then removing the residue before it has a chance to re-settle. Grease is not one thing; it is a mix of oils, carbonised food, airborne cooking vapour, and tiny bits of baked-on spillover. Once heat has done its work, those layers harden like varnish. That is why a damp cloth alone often fails.
A proper grease rebuild approach usually includes four stages:
- Assessment - identify where the worst staining sits: glass, oven walls, seals, racks, trays, fan cover, or around the door edge.
- Softening - apply a suitable degreaser or cleaning paste and allow enough dwell time for the residue to loosen.
- Removal - lift grease with the right cloth, scraper, pad, or brush without scratching enamel or glass.
- Finishing - clear the corners, rinse surfaces, dry properly, and check for missed residue once the oven is cool and clean.
The key detail is patience. Grease does not always release at the first swipe. Sometimes it needs two passes, and sometimes the tricky areas need manual work with a small detail brush or a non-abrasive pad. A bit of elbow grease, as people say, though in this case the elbow grease should really go into the method, not just the effort.
Heat can also reveal where the stains are rebuilding. If a cleaned oven smells oily when preheated, that is often a sign residue is still trapped in the fan area or around hidden seams. For households dealing with an urgent smell issue as well as visible staining, our practical notes on same-day oven deodorising options may be useful alongside this guide.
Key Benefits and Practical Advantages
When grease rebuilds are tackled properly, the difference is immediate and, frankly, a bit satisfying. The oven looks cleaner, smells cleaner, and cooks more consistently. More importantly, the clean lasts longer because the hidden residue has actually been dealt with.
- Better cooking results - less smoke, less lingering smell, and fewer greasy odours transferred to food.
- Longer-lasting cleanliness - removing deep residue helps prevent that quick return of staining.
- Improved appearance - glass, enamel, racks, and trim look far more presentable.
- Reduced fire risk from built-up residue - while most domestic build-up is manageable, heavy grease is never something to ignore.
- Less effort later - a proper reset is easier to maintain than repeated half-cleans.
- Better move-out presentation - especially useful for tenancy handovers and final inspections.
There is also a small but real psychological benefit. A clean oven changes the whole tone of a kitchen. You notice it when you open the door. It looks cared for. That matters more than people often think, especially in compact London kitchens where one grimy appliance can drag the whole room down.
For tenants and landlords alike, pairing oven care with other tasks such as end of tenancy cleaning in Putney or a broader house cleaning service can save time and reduce the chance of missed details.
Who This Is For and When It Makes Sense
This kind of oven cleaning is useful for more people than you might expect. It is not only for households with heavy cooking habits. Even a lightly used oven can develop persistent stains if grease splatter has been left in place and baked on over a few months.
It tends to make sense for:
- busy households that only notice the oven when it already looks tired;
- renters getting ready for check-out or inventory photos;
- landlords preparing a kitchen between tenancies;
- homeowners dealing with smoke, odour, or recurring stains after cooking;
- anyone who has tried a quick clean and found the marks return within days;
- people who want a one-off reset rather than a recurring maintenance task.
It is also a good fit if you have a self-cleaning oven function but the racks, door, or outer trim still need attention. Those features are helpful, but they rarely solve every problem on their own. Some people expect the oven to come out spotless after a cycle and then feel puzzled when the seals still look grimy. Happens all the time.
If you are comparing options, it can help to read about one-off cleaning in Putney and the wider domestic cleaning support available for homes that need more than a quick refresh.
Step-by-Step Guidance
If you want to tackle persistent oven stains yourself, the safest route is to work methodically. Rushing usually leaves streaks behind. Here is a sensible approach that works for most domestic ovens.
- Switch off and let the oven cool completely. Never work on a warm cavity. Cleaning products behave differently on hot surfaces, and you do not want fumes building up.
- Remove loose parts. Take out racks, trays, and any removable panels only if the manufacturer allows it. Place them somewhere safe.
- Vacuum or brush out crumbs. Dry debris gets in the way. Clearing it first stops grease from turning into a sludge.
- Apply degreaser carefully. Use a product suited to ovens, or a mild paste where appropriate. Follow the product instructions and avoid over-wetting seals and electrics.
- Let it dwell. This part matters. Ten minutes is not always enough. Stubborn bake-on grease may need longer.
- Work from the top down. Wipe softened residue away in sections so you are not smearing dirt back onto a clean patch.
- Treat the detail areas. Use a soft brush or cotton bud for hinges, door edges, knobs, and fan covers where grime collects.
- Rinse and dry. Residual cleaner can leave marks or smell if it is not removed fully.
- Reassemble and test. Once dry, run the oven briefly if the product instructions recommend it, then check for remaining odour or smoke.
A small note from experience: if a stain is still there after the first round, do not immediately reach for something harsher. Give the residue another proper soak. Most mistakes happen at that point, when people switch to a stronger chemical too quickly. That is how glass gets scratched or seals get damaged.
If you are dealing with bulky trays, side panels, or old oven accessories that need clearing out, this piece on disposal steps for bulky oven parts is a handy companion read.
Expert Tips for Better Results
Here is where a few small habits make a big difference. The basics are obvious; the results come from the details.
- Warm residue responds better than cold residue - not hot, just slightly softened. A recently used oven should still be fully cooled, but the principle remains: baked-on grease loosens more predictably when given time and the right product.
- Use multiple cloths - one for lifting grime, one for rinsing, one for drying. Reusing a dirty cloth just moves grease around.
- Do the seals gently - rubber and silicone edges can trap residue, but they are easy to damage if you scrub hard.
- Check the door glass from two angles - streaks often hide until the light catches them.
- Do not forget the underside of the oven lip - this little ledge is a classic hiding place for brown buildup.
- Let the final dry stage happen naturally - a dry oven tends to stay cleaner for longer than one left slightly damp behind the door.
One practical trick: if you are not sure whether a mark is grease or discolouration, wipe it with a clean damp cloth after the first degrease. If it lightens but does not vanish, it is probably still residue rather than permanent staining. That helps you decide whether to repeat the process or stop before overworking the surface.
And yes, the oven might look worse before it looks better. Bit of a drama, that stage. Normal enough.

Common Mistakes to Avoid
Most failed oven cleans are not about effort. They are about sequence, product choice, or impatience. A few common errors show up again and again.
- Cleaning only visible surfaces - the stain returns because hidden residue remains in seams and edges.
- Using abrasive tools on glass or enamel - this can leave permanent marks and make future cleaning harder.
- Overusing harsh chemicals - stronger is not always better, especially near seals and controls.
- Skipping the rinse - leftover cleaner can create streaks, smell, or a sticky film.
- Cleaning too quickly - grease needs dwell time. Wiping immediately often just spreads it.
- Ignoring racks and trays - putting dirty accessories back into a clean oven is a classic reset-killer.
- Mixing products - never blend cleaners unless the instructions clearly allow it.
There is also a bigger mistake: assuming the oven is the only issue. Grease can migrate to extractor panels, nearby tiles, and even soft furnishings if the kitchen has been heavily used. If the room around the oven feels sticky too, you may need a broader clean rather than a single-appliance fix. In that case, a combined approach with spring cleaning support or even upholstery cleaning in Putney can make the whole kitchen feel reset, not just the oven itself.
Tools, Resources and Recommendations
You do not need a cupboard full of specialist kit, but the right basics make the job easier and safer.
| Item | Why it helps | What to watch for |
|---|---|---|
| Microfibre cloths | Good for lifting grease without leaving lint | Use clean cloths in stages, not one cloth for everything |
| Non-abrasive pads | Help with baked-on residue on durable surfaces | Avoid anything that can scratch glass or enamel |
| Soft detail brush | Useful around hinges, seals, and vents | Do not push debris deeper into gaps |
| Oven-safe degreaser | Breaks down stubborn residue effectively | Follow the instructions closely and ventilate well |
| Rubber gloves | Protects skin from cleaning products | Replace if they tear or become slippery |
| Old towels or paper | Good for catching drips and drying edges | Keep them away from any hot surface |
For people who would rather not spend an evening on their knees with a toothbrush and a resigned expression, it is worth considering a professional deep clean. If you want to understand how pricing is typically handled, the page on pricing and quotes is a sensible place to start. You can also learn more about the company background on about us, which is useful if trust and process matter to you before booking.
For broader practical reading, these local guides are useful companions: oven cleaning on Putney High Street and what to expect near Putney Station. They are especially handy if you are comparing real-world service options rather than just trying to fix one stubborn oven ring.
Law, Compliance, Standards, or Best Practice
For domestic oven cleaning, the main concerns are safety, product use, and reasonable care. You are not usually dealing with formal regulation in the way you might with commercial kitchens, but best practice still matters. That means using products as directed, keeping the area ventilated, protecting skin and eyes where needed, and avoiding contamination of food-contact surfaces.
If you are cleaning in a rented property, it is sensible to keep records or photos if the oven was badly stained before you started, especially if a landlord, letting agent, or checkout report is involved. That helps avoid awkward conversations later. Not glamorous, but useful.
Professional cleaners should also follow sensible health and safety practices: suitable PPE, product handling, and awareness of hot surfaces, wiring, and fragile seals. If you are choosing a provider, it is reasonable to ask how they work and whether they have a documented approach to safety. You can read the company's health and safety policy and, if needed, the insurance and safety information for added reassurance.
For larger property turnovers, related cleaning services may also need to align neatly with tenancy timelines and access arrangements. In those cases, the terms and conditions and the complaints procedure are worth reviewing before you book. It is the boring stuff, yes, but boring stuff protects everybody.
Options, Methods, or Comparison Table
There is no single best method for every oven. The right choice depends on how deep the staining is, how much time you have, and how comfortable you are using cleaning products.
| Method | Best for | Pros | Limitations |
|---|---|---|---|
| Basic wipe-down | Light splashes and fresh residue | Quick and low-cost | Usually not enough for grease rebuilds |
| Manual degreasing | Moderate staining and detailed work | Targeted and flexible | Takes time and patience |
| Self-clean cycle | Some built-in ovens with suitable settings | Helpful for internal burn-off | Does not fully replace manual detailing |
| Professional deep clean | Heavy build-up, move-outs, or limited time | More thorough and usually more consistent | Costs more than doing it yourself |
If the oven is just mildly grubby, a careful manual clean may be enough. If it smells smoky every time you heat it, or the same stain returns after two home attempts, a proper professional visit is often the better use of time. The expensive option is not always expensive in the long run. Especially if you count your own Saturday.
Case Study or Real-World Example
A fairly typical SW15 scenario goes like this: a tenant in a two-bedroom flat notices the oven door glass has gone cloudy, and the back wall has a dark patch that keeps reappearing. The first clean uses a supermarket spray and a cloth, which makes the surface look better for a day or two. Then the oven is switched on for Sunday lunch, and the smell comes back. Not ideal.
On inspection, the issue turns out to be build-up in three places: the door edge, the lower lip inside the cavity, and a strip around the fan cover. The fix is not complicated, just more thorough. The oven is cooled, trays removed, crumbs cleared, degreaser applied in sections, and the hidden corners are worked gently with a soft brush. The glass is cleaned last. After drying, the oven no longer smokes lightly when preheated, and the staining is reduced to faint marks instead of a visible brown ring.
The lesson? What looks like a stain problem is often a residue problem. Once the residue is removed properly, the stain stops "rebelling" and the oven is much easier to maintain. Simple enough, but easy to miss when you are in a hurry.
Practical Checklist
Use this as a quick final check before you start or before you decide to book help.
- Is the oven fully cool before cleaning?
- Have racks, trays, and removable parts been taken out safely?
- Have crumbs and dry debris been removed first?
- Are you using a product suitable for ovens?
- Have you allowed enough dwell time for the cleaner to work?
- Have you checked seams, seals, hinges, and fan cover edges?
- Have you rinsed and dried every cleaned surface?
- Are there signs of recurring smoke, smell, or sticky residue?
- Do you need help with a tenancy deadline or a broader household clean?
- Have you read the relevant service and policy information before booking?
If you have answered "no" to several of these, it may be worth stepping back and reassessing rather than forcing the job. That is usually the moment where a professional clean starts to make sense.
Get a free quote today and see how much you can save.
Conclusion
Grease rebuilds are frustrating, but they are rarely mysterious. In most cases, the problem is not that the oven cannot be cleaned. It is that the cleaning has not reached the places where grease likes to hide. Once you understand the pattern, the fix becomes much more manageable: assess properly, soften patiently, clean in sections, and finish with detail work that gets into the edges.
For homes in SW15, that approach saves time, improves hygiene, and helps stop the same stains from coming back week after week. Whether you are maintaining a family kitchen, preparing for guests, or facing a move-out deadline, a proper oven reset is one of those small jobs that makes the whole home feel better. And honestly, that fresh, clean oven smell when you open the door for the first time? Hard to beat.
When you are ready for a cleaner, calmer kitchen, take the next step with confidence. A little care goes a long way, and sometimes that is all it takes to make the room feel right again.